全记录,旨在能够找到回家的路。
环境配置#
Hexo 是一个快速、简洁且高效的博客框架。Hexo 使用 Markdown(或其他渲染引擎)解析文章,在几秒内,即可利用靓丽的主题生成静态网页。 安装 Hexo 相当简单,只需要先安装下列应用程序即可:
Git#
安装#
对于中国大陆地区用户,可以前往 淘宝 Git for Windows 镜像 下载 git 安装包。
- Windows:下载并安装 git.
- Mac:使用 Homebrew, MacPorts 或者下载 安装程序。
- Linux (Ubuntu, Debian):
sudo apt-get install git-core - Linux (Fedora, Red Hat, CentOS):
sudo yum install git-core
配置Git与GitHub#
此处为全局配置,所以可以在任意位置打开git bash,设置用户名称和邮件地址。
git config --global user.name "<yourusername>"
git config --global user.email "<youremail>"设置完成后为了能够在本地使用git管理github上的项目,需要绑定SSHkey。
ssh-keygen -t rsa -C <youremail>
# -C后面加你在github的用户名邮箱,这样公钥才会被github认可
less ~/.ssh/id_rsa.pub
# 查看公钥内容稍后加入Github账户的sshkey中,
打开 GitHub网页
单击头像->settings,在设置页面找到SSH and GPG keys,单击New SSH key新建SSH KEY。
保存后,在git bash测试SSH KEY是否添加成功,输入
ssh -T [email protected]
# Attempts to ssh to GitHub
正常的输出结果是:
The authenticity of host 'github.com (207.97.227.239)' can't be established.
RSA key fingerprint is 16:27:ac:a5:76:28:2d:36:63:1b:56:4d:eb:df:a6:48.
Are you sure you want to continue connecting (yes/no)?
# 此处请输入yes
Hi username! You've successfully authenticated, but GitHub does not
provide shell access.Node.js#
安装#
Node.js 为大多数平台提供了官方的 安装程序。对于中国大陆地区用户,可以前往 淘宝 Node.js 镜像 下载。
其它的安装方法:
- Windows:通过 nvs(推荐)或者 nvm 安装。
- Mac:使用 Homebrew 或 MacPorts 安装。
- Linux(DEB/RPM-based):从 NodeSource 安装。
- 其它:使用相应的软件包管理器进行安装,可以参考由 Node.js 提供的 指导。
对于 Mac 和 Linux 同样建议使用 nvs 或者 nvm,以避免可能会出现的权限问题。
安装 Hexo#
所有必备的应用程序安装完成后,首先需要建立博客文件夹,建议建在非系统盘,例如
D:/Hexo/,那么这个目录就是我们博客的根目录了。因为每个人的命名习惯不同,本帖之后会以[Blogroot]指代博客根目录。使用
npm安装Hexo,在[Blogroot]路径下右键->Git Bash Here,输入npm config set registry https://registry.npmmirror.com #将npm源替换为阿里的镜像。之后的安装就会迅速很多了。 npm install hexo-cli -g # hexo-cli 是 hexo的指令集。 hexo init # 有了指令集以后,使用它的初始化指令来初始化安装Hexo博客。安装插件,依然是在
[Blogroot]路径下右键->Git Bash Here,使用npm指令挑选需要的插件安装。(请仔细阅读注释,确定你是否需要安装这个插件)。npm install hexo-admin --save # 网页端hexo文档管理插件,如无需求,可跳过 npm install hexo-deployer-git --save # git部署插件,必须安装 npm install hexo-renderer-stylus --save # nib css支持插件,如无需求,可跳过 npm install hexo-generator-feed --save # RSS订阅支持插件,如无需求,可跳过 npm install hexo-generator-sitemap --save # sitemap生成插件,帮助搜索引擎抓取,如无需求,可跳过Hexo Bash常用命令
hexo clean
#清空缓存
hexo generate
hexo g #简写
#重新编译
hexo server
hexo s #简写
#打开本地访问
hexo new <layout> "文章title"
#新建文章
hexo deploy
hexo d #简写
#部署到云端
首次本地预览:在
[Blogroot]路径下右键->Git Bash Here,输入hexo clean && hexo g && hexo s然后在浏览器中打开
localhost:4000,就能看到博客首页了。如果你安装了
hexo-admin插件,就可以通过访问 localhost:4000/admin 来管理你的文章了。并且在可视化界面中操作文章内容。恭喜你,博客的本地部署到这里算是告一段落了。
部署到GitHub#
新建
username.github.io仓库:在
GitHub首页单击头像->Your repositories在自己的 GitHub 账号下创建一个新的仓库,命名为aphcity.github.io。配置hexo部署插件内容:
- 确保你安装了
hexo-deployer-git,如果没有,在[Blogroot]路径下右键->Git Bash Here,输入:
npm install hexo-deployer-git --save- 打开
[Blogroot]/_config.yml,修改底部的deploy配置项。如果没有找到deploy配置项,则自己添加:
# 站点部署到github要配置Deployment ## Docs: https://zespia.tw/hexo/docs/deploy.html deploy: type: git repo: github: url: [email protected]:Aphcity/aphcity.github.io.git # username为自己的用户名 branch: gh-page # 亦可以使用默认分支为main,注意修改- 确保你安装了
把本地
hexo博客内容提交到git仓库- 若以上内容已经准确配置,在
[Blogroot]路径下右键->Git Bash Here,输入:
hexo clean && hexo g && hexo d- 不出意外,就可以在浏览器上输入
https://aphcity.github.io访问你的博客了。
- 若以上内容已经准确配置,在
安装 Butterfly#
稳定版【建议】
在[Blogroot]路径下右键->Git Bash Here,输入:
git clone -b master https://github.com/jerryc127/hexo-theme-butterfly.git themes/butterfly测试版
测试版可能存在 bug,追求稳定的请安装稳定版
如果想要安装比较新的 dev 分支,可以
git clone -b dev https://github.com/jerryc127/hexo-theme-butterfly.git themes/butterfly升级方法:在主题目录下,运行 git pull
应用主题#
修改 Hexo 根目录下的 _config.yml,把主题改为 butterfly
theme: butterfly安装插件#
如果你没有 pug 以及 stylus 的渲染器,请下载安装:
npm install hexo-renderer-pug hexo-renderer-stylus --save升级建议#
在[Blogroot]路径下创建一个文件 _config.butterfly.yml,并把主题目录的 _config.yml 内容复制到 _config.butterfly.yml 去。( 注意: 复制的是主题的 _config.yml ,而不是 hexo 的 _config.yml)
同时,为了防止出现诸如 git commit 内容是主题文档的 git commit history 的错误,打开[Blogroot]\.gitgnore,手动添加 themes/butterfly/.git,一劳永逸
博客配置#
您可以在 _config.yml 中修改大部分的配置。
网站#
| 参数 | 描述 |
|---|---|
title | 网站标题 |
subtitle | 网站副标题,告诉搜索引擎一个关于您站点的简单描述 |
description | 网站描述 |
keywords | 网站的关键词。支持多个关键词。 |
author | 您的名字 |
language | 网站使用的语言。对于简体中文用户来说,使用不同的主题可能需要设置成不同的值,请参考你的主题的文档自行设置,常见的有 zh-Hans和 zh-CN。 |
timezone | 网站时区。Hexo 默认使用您电脑的时区。对于中国大陆地区可以使用 Asia/Shanghai。 |
title: Aphcity の 窝
subtitle: "树洞日记"
description: "无所事事所以充满动力"
keywords:
author: Aphcity
language: zh-CN
timezone: "Asia/Shanghai"网址#
| 参数 | 描述 | 默认值 |
|---|---|---|
| url | 网址, 必须以 http:// 或 https:// 开头 | |
| permalink | 文章的 永久链接 格式 | :year/:month/:day/:title/ |
| permalink_defaults | 永久链接中各部分的默认值 | |
| pretty_urls.trailing_index | 是否在永久链接中保留尾部的 index.html,设置为 false 时去除 | TRUE |
| pretty_urls.trailing_html | 是否在永久链接中保留尾部的 .html, 设置为 false 时去除 (对尾部的 index.html无效) | TRUE |
url: https://aphcity.github.io/
permalink: :year/:month/:day/:title/
permalink_defaults:
pretty_urls:
  trailing_index: true # Set to false to remove trailing 'index.html' from permalinks
trailing_html: true # Set to false to remove trailing '.html' from permalinks域名配置#
为了能够使用自己的域名访问我们的博客,需要再进行域名绑定:
首先要获取博客当前默认域名的IP,打开cmd或者powershell,输入:
ping aphcity.github.io获取到的ip地址填入域名解析。进入解析页面后需要添加两条记录。
| 主机记录 | 类型 | 记录值 |
|---|---|---|
| @ | A | ip |
| www | CNAME | aphcity.github.io |
在[Blogroot]\source\目录下新建CNAME文件(注意不要有后缀名,就叫CNAME即可,什么.txt、.js之类的后缀都不能有),在CNAME文件中添加上你购买的域名。
aphcity.cyou配置username.github.io仓库。
打开username.github.io,点击仓库页面右上角的 setting,下拉找到 Github Pages 栏,在 Custom domain 中填入你购买的域名。
最后,重新部署一下 hexo 即可通过你的域名来访问博客了
永久链接配置#
Hexo URL 的默认规则是 年/月/日/标题,这样其实不利于SEO。
Hexo文章的url在博客根目录的_config.yml中进行配置,默认配置如下:
permalink: :year/:month/:day/:title/这里的:title为source/_post下的相对路径,但是这样的话很容易造成url中文乱码,和不同浏览器因为字符集的问题导致的url失效。
这里建议尽量不使用默认配置,推荐使用如下采用 hash 值的方案:
直接修改_config.yml为:
permalink: :category/:hash/这样每次生成文章url,会自动生成hash值,保证不重复且不会因为编码出错。
Algolia 搜索#
你需要安装 hexo-algolia ,根据它们的说明文档去做相应的配置。
安装
hexo-algolianpm install --save hexo-algolia修改
_config.butterfly.ymlalgolia_search: enable: true hits: per_page: 6新建一个
index左侧侧边栏找到
API Keys,进入后,点击ALL API Keys,这点比较重要,因为前面的API不可用,要自己新建一个拥有增加删除权限的api key点击
New API Key,如图所示,重要的是在ACL里面增加删除和新增Object的权限,然后填上indices栏目中的index name,可以选刚才你创建的那个index,其余默认就行。这样你就有了一个
API Key。修改
_config.yml注意
apikey填写刚才你创建的那个有权限的,其余的在Your API Keys里面可以找到algolia: applicationID: 'applicationID' # Your Algolia Application ID apiKey: 'apiKey' # A **Search-Only** API key adminApiKey: 'your adminApiKey' indexName: '...' # The name of the Algolia index to use chunkSize: 5000上传数据到
algolia,下面your apiKey替换为刚才自己创建拥有权限的apiexport HEXO_ALGOLIA_INDEXING_KEY=your apiKey hexo algolia看到如下信息,证明成功了,可以去
Algolia网站上查看,索引已经上传成功了。INFO [Algolia] Testing HEXO_ALGOLIA_INDEXING_KEY permissions. INFO Start processing INFO [Algolia] Identified 5 pages and posts to index. INFO [Algolia] Indexing chunk 1 of 1 (50 items each) INFO [Algolia] Indexing done.
Katex 配置#
测试:$f’(x)$
首先禁用 MathJax(如果你配置过 MathJax 的话),然后修改你的主题配置文件以便加载 katex.min.css :
katex:
  enable: true
  # true 表示每一页都加载katex.js
  # false 需要时加载,须在使用的Markdown Front-matter 加上 katex: true
  per_page: false
  hide_scrollbar: true
你不需要添加 katex.min.js 来渲染数学方程。相应的你需要卸载你之前的 hexo 的 markdown 渲染器,然后安装其它插件。
卸载掉 marked 插件,安装 hexo-renderer-markdown-it
npm un hexo-renderer-marked --save
npm un hexo-renderer-kramed --save
npm i hexo-renderer-markdown-it --save
npm install @neilsustc/markdown-it-katex --save
在 hexo 的根目录的 _config.yml 中配置
markdown:
  plugins:
    - plugin:
      name: '@neilsustc/markdown-it-katex'
      options:
        strict: false
Twikoo 评论系统#
Twikoo 是一个简洁、安全、无后端的静态网站评论系统,基于腾讯云开发。
具体如何配置评论,请查看 Twikoo文档
你只需要把获取到的 环境ID (envId) 填写到配置上去就行
修改 _config.butterfly.yml
twikoo:
  envId: # 环境 ID
  region: # 环境地域,默认为 ap-shanghai
  visitor: false # 是否显示文章閲读数,开启 visitor 后,文章页的访问人数将改为 Twikoo 提供,而不是 不蒜子
option: # 可选配置Git-Calendar#
安装插件,在博客根目录
[Blogroot]下打开终端,运行以下指令:npm install hexo-filter-gitcalendar --save添加配置信息,在站点配置文件
_config.yml或者主题配置文件如_config.butterfly.yml中添加:# hexo-filter-gitcalendar # see https://akilar.top/posts/1f9c68c9/ gitcalendar: enable: true # 开关 priority: 5 #过滤器优先权 enable_page: / # 应用页面 # butterfly挂载容器 layout: # 挂载容器类型 type: id name: recent-posts index: 0 user: Aphcity #git用户名 apiurl: "https://gitcalendar.aphcity.cyou" minheight: pc: 280px #桌面端最小高度 mobile: 100px #移动端最小高度 color: "['rgba(139, 141, 145, 0.25)', '#9be9a8', '#8ddb9c', '#80ce8f', '#72c083', '#65b277', '#57a56a', '#4a975e', '#3c8952', '#2f7c45', '#216e39']" # 适配夜间模式的仿 GitHub 配色 container: .recent-post-item(style='width:100%;height:auto;padding:10px;') #父元素容器,需要使用pug语法 gitcalendar_css: https://npm.elemecdn.com/hexo-filter-gitcalendar/lib/gitcalendar.css gitcalendar_js: https://npm.elemecdn.com/hexo-filter-gitcalendar/lib/gitcalendar.js
页脚计时器和页脚徽标#
安装插件,在博客根目录
[Blogroot]下打开终端,运行以下指令:npm install hexo-butterfly-footer-beautify --save添加配置信息,在站点配置文件
_config.yml或者主题配置文件_config.butterfly.yml中添加# footer_beautify # 页脚计时器:[Native JS Timer](https://akilar.top/posts/b941af/) # 页脚徽标:[Add Github Badge](https://akilar.top/posts/e87ad7f8/) footer_beautify: enable: timer: true # 计时器开关 bdage: true # 徽标开关 priority: 5 #过滤器优先权 enable_page: all # 应用页面 exclude: # 屏蔽页面 # - /posts/ # - /about/ layout: # 挂载容器类型 type: id name: footer-wrap index: 0 # 计时器部分配置项 runtime_js: /js/runtime.js runtime_css: https://npm.elemecdn.com/[email protected]/lib/runtime.css # 徽标部分配置项 swiperpara: 3 #若非0,则开启轮播功能,每行徽标个数 bdageitem: - link: https://hexo.io/ #徽标指向网站链接 shields: https://img.shields.io/badge/Frame-Hexo-blue?style=for-the-badge&logo=hexo #徽标API message: 博客框架为Hexo_v5.4.1 #徽标提示语 - link: https://butterfly.js.org/ shields: https://img.shields.io/badge/Theme-Butterfly-6513df?style=for-the-badge&logo=bitdefender message: 主题版本Butterfly_v4.0.1 - link: https://www.jsdelivr.com/ shields: https://img.shields.io/badge/CDN-jsDelivr-orange?style=for-the-badge&logo=jsDelivr message: 本站使用JsDelivr为静态资源提供CDN加速 # - link: https://vercel.com/ # shields: https://img.shields.io/badge/Hosted-Vercel-brightgreen?style=for-the-badge&logo=Vercel # message: 本站采用双线部署,默认线路托管于Vercel # - link: https://vercel.com/ # shields: https://img.shields.io/badge/Hosted-Coding-0cedbe?style=for-the-badge&logo=Codio # message: 本站采用双线部署,联通线路托管于Coding - link: https://github.com/ shields: https://img.shields.io/badge/Source-Github-d021d6?style=for-the-badge&logo=GitHub message: 本站项目由Github托管 - link: http://creativecommons.org/licenses/by-nc-sa/4.0/ shields: https://img.shields.io/badge/Copyright-BY--NC--SA%204.0-d42328?style=for-the-badge&logo=Claris message: 本站采用知识共享署名-非商业性使用-相同方式共享4.0国际许可协议进行许可 swiper_css: https://npm.elemecdn.com/hexo-butterfly-swiper/lib/swiper.min.css swiper_js: https://npm.elemecdn.com/hexo-butterfly-swiper/lib/swiper.min.js swiperbdage_init_js: https://npm.elemecdn.com/hexo-butterfly-footer-beautify/lib/swiperbdage_init.min.js
日志自动分类插件#
Hexo写日志,通常我们都需要维护一个front-matter信息,包括title、date。博客多了,为了方便日志分类,一般还需要设置categories。
比如下面的例子:
---
title: Hexo简介
date: 2008-08-08
categories:
  - web开发
  - 前端
  - 博客框架
---本文介绍一种自动生成categories的插件 hexo-auto-category官方地址。
对于博客 source/_post/web/framework/hexo.md,该插件会自动生成以下categories
categories:
  - web
  - framework
安装
npm install hexo-auto-category --save配置 在站点根目录下的
_config.yml添加:# Generate categories from directory-tree # Dependencies: https://github.com/xu-song/hexo-auto-category # depth: the depth of directory-tree you want to generate, should > 0 auto_category: enable: true depth: # 如果只想生成第一级目录分类,可以设置`depth`属性为 1
gulp 压缩静态资源#
gulp能够帮助用户自动压缩静态资源,配合各类下属插件,能够压缩包括css、js、html乃至各类格式的图片文件。(图片文件的压缩往往只能节省几十KB,效果远远不如imagine、tinypng等压缩方式,所以此处不再写使用gulp压缩图片的内容)
安装Gulp插件:在博客根目录
[Blogroot]打开终端,输入:npm install --global gulp-cli #全局安装gulp指令集 npm install gulp --save #安装gulp插件安装各个下属插件以实现对各类静态资源的压缩。
压缩 HTML:
npm install gulp-htmlclean --save-dev
npm install gulp-html-minifier-terser --save-dev
# 用gulp-html-minifier-terser可以压缩HTML中的ES6语法
压缩 CSS:
npm install gulp-clean-css --save-dev压缩 JS:
gulp-terser只会直接压缩js代码,所以不存在因为语法变动导致的错误 。事实上,当我们使用
jsdelivr的CDN服务时,只需要在css或者js的后缀前添加.min,例如example.js->example.min.js,JsDelivr就会自动使用terser帮我们压缩好代码。npm install gulp-terser --save-dev压缩字体包
npm install gulp-fontmin --save-dev
为Gulp创建
gulpfile.js任务脚本。在博客根目录[Blogroot]下新建gulpfile.js,打开[Blogroot]\gulpfile.js,输入以下内容://用到的各个插件 var gulp = require('gulp'); var cleanCSS = require('gulp-clean-css'); var htmlmin = require('gulp-html-minifier-terser'); var htmlclean = require('gulp-htmlclean'); var fontmin = require('gulp-fontmin'); // gulp-tester var terser = require('gulp-terser'); // 压缩js gulp.task('compress', async() =>{ gulp.src(['./public/**/*.js', '!./public/**/*.min.js']) .pipe(terser()) .pipe(gulp.dest('./public')) }); //压缩css gulp.task('minify-css', () => { return gulp.src(['./public/**/*.css']) .pipe(cleanCSS({ compatibility: 'ie11' })) .pipe(gulp.dest('./public')); }); //压缩html gulp.task('minify-html', () => { return gulp.src('./public/**/*.html') .pipe(htmlclean()) .pipe(htmlmin({ removeComments: true, //清除html注释 collapseWhitespace: true, //压缩html collapseBooleanAttributes: true, //省略布尔属性的值,例如:<input checked="true"/> ==> <input /> removeEmptyAttributes: true, //删除所有空格作属性值,例如:<input id="" /> ==> <input /> removeScriptTypeAttributes: true, //删除<script>的type="text/javascript" removeStyleLinkTypeAttributes: true, //删除<style>和<link>的 type="text/css" minifyJS: true, //压缩页面 JS minifyCSS: true, //压缩页面 CSS minifyURLs: true //压缩页面URL })) .pipe(gulp.dest('./public')) }); //压缩字体 function minifyFont(text, cb) { gulp .src('./public/fonts/*.ttf') //原字体所在目录 .pipe(fontmin({ text: text })) .pipe(gulp.dest('./public/fontsdest/')) //压缩后的输出目录 .on('end', cb); } gulp.task('mini-font', (cb) => { var buffers = []; gulp .src(['./public/**/*.html']) //HTML文件所在目录请根据自身情况修改 .on('data', function(file) { buffers.push(file.contents); }) .on('end', function() { var text = Buffer.concat(buffers).toString('utf-8'); minifyFont(text, cb); }); }); // 运行gulp命令时依次执行以下任务 gulp.task('default', gulp.parallel( 'compress', 'minify-css', 'minify-html','mini-font' ))
魔改优化日记#
合并CSS以减少请求次数#
将魔改样式整合到index.css文件内,减少对服务器的请求次数。能够节省大量加载时间。
我的做法如下:
在
[Blogroot]\themes\butterfly\source\css\路径下新建_custom文件夹,然后把魔改样式的CSS文件拖动进去。文件目录层级可以表示为以下情况:source |__ css |__ _custom |__ custom1.css |__ custom2.css |__ custom3.css |__ index.styl在
[Blogroot]\themes\butterfly\source\css\index.styl中新增一行代码:@import '_custom/*.css',表示引入_custom文件夹下的所有CSS文件。
       @import 'nib'
       @import '_third-party/*.css'
+      @import '_custom/*.css'
       // project
       @import 'var'
       @import '_global/*'
博客使用一图流#
去除背景配置#
打开主题配置文件(注意:不是博客配置文件)
_config.yml,按Ctrl+F快捷键弹出搜索框,输入banner关键词,将以下图片链接去掉。修改如下配置项:# Disable all banner image disable_top_img: false # The banner image of home page index_img: # If the banner of page not setting, it will show the top_img default_top_img: transparent # The banner image of archive page archive_img: # If the banner of tag page not setting, it will show the top_img # note: tag page, not tags page (子標籤頁面的 top_img) tag_img: # The banner image of tag page # format: # - tag name: xxxxx tag_per_img: # If the banner of category page not setting, it will show the top_img # note: category page, not categories page (子分類頁面的 top_img) category_img: # The banner image of category page # format: # - category name: xxxxx category_per_img:搜索关键词
background, 将颜色设置为:# Website Background (設置網站背景) # can set it to color or image (可設置圖片 或者 顔色) # The formal of image: url(http://xxxxxx.com/xxx.jpg) background: url(/img/banner.jpg) # 修改为自己的图片 # Footer Background footer_bg: transparent
引入魔改样式,修改 CSS 样式#
以 butterfly 主题为例,可以在
[Blogroot]\themes\butterfly\source\css\目录下新建 custom.css 文件,然后在_config.butterfly.yml的inject配置项中引入自定义样式文件。inject: head: - <link rel="stylesheet" href="/css/custom.css" media="defer" onload="this.media='all'">其中
media="defer" onload="this.media='all'"是异步加载配置项,确保自定义样式会在页面加载完成后才继续渲染。如果没有需求或效果不好可以不加这个。我的博客一图流
css样式设置如下,修改custom.css文件:/* 首页文章卡片 */ #recent-posts > .recent-post-item {background: rgba(255, 255, 255, 0.85);} /* 首页侧栏卡片 */ .card-widget {background: rgba(255, 255, 255, 0.85) !important;} /* 文章页面正文背景 */ div#post {background: rgba(255, 255, 255, 0.85);} /* 分页页面 */ div#page {background: rgba(255, 255, 255, 0.85);} /* 归档页面 */ div#archive {background: rgba(255, 255, 255, 0.85);} /* 标签页面 */ div#tag {background: rgba(255, 255, 255, 0.85);} /* 分类页面 */ div#category {background: rgba(255, 255, 255, 0.85);} #footer {opacity: 0.5;} /* 页脚透明 */ #footer {background: transparent !important;} /* 页脚黑色透明玻璃效果移除 */ #footer::before {background: transparent !important;} /* 头图透明 */ #page-header {background: transparent !important;} /*top-img黑色透明玻璃效果移除,不建议加,除非你执着于完全一图流或者背景图对比色明显 */ #page-header.post-bg:before {background-color: transparent !important;} /*阅读模式修改*/ .read-mode #aside-content .card-widget {background: rgba(158, 204, 171, 0.5) !important;} .read-mode div#post {background: rgba(158, 204, 171, 0.5) !important;} /*夜间模式修改*/ /*夜间模式伪类遮罩层透明*/ [data-theme="dark"] #footer::before {background: transparent !important;} [data-theme="dark"] #page-header::before {background: transparent !important;} /* 首页文章卡片 */ [data-theme="dark"] #recent-posts > .recent-post-item {background: rgba(0, 0, 0, 0.5) !important;} /* 头图透明 */ [data-theme="dark"] #aside-content .card-widget {background: rgba(0, 0, 0, 0.5) !important;} /* 文章页面正文背景 */ [data-theme="dark"] div#post {background: rgba(0, 0, 0, 0.5) !important;} [data-theme="dark"] div#archive {background: rgba(0, 0, 0, 0.5) !important;} [data-theme="dark"] div#category {background: rgba(0, 0, 0, 0.5) !important;} [data-theme="dark"] div#page {background: rgba(0, 0, 0, 0.5) !important;} /*夜间阅读模式*/ [data-theme="dark"] .read-mode #aside-content .card-widget {background: rgba(0, 0, 0, 0.5) !important;color: #ffffff;} [data-theme="dark"] .read-mode div#post {background: rgba(0, 0, 0, 0.5) !important;color: #ffffff;}
主题升级#
进入 [Blogroot]/themes ,打开终端,输入:
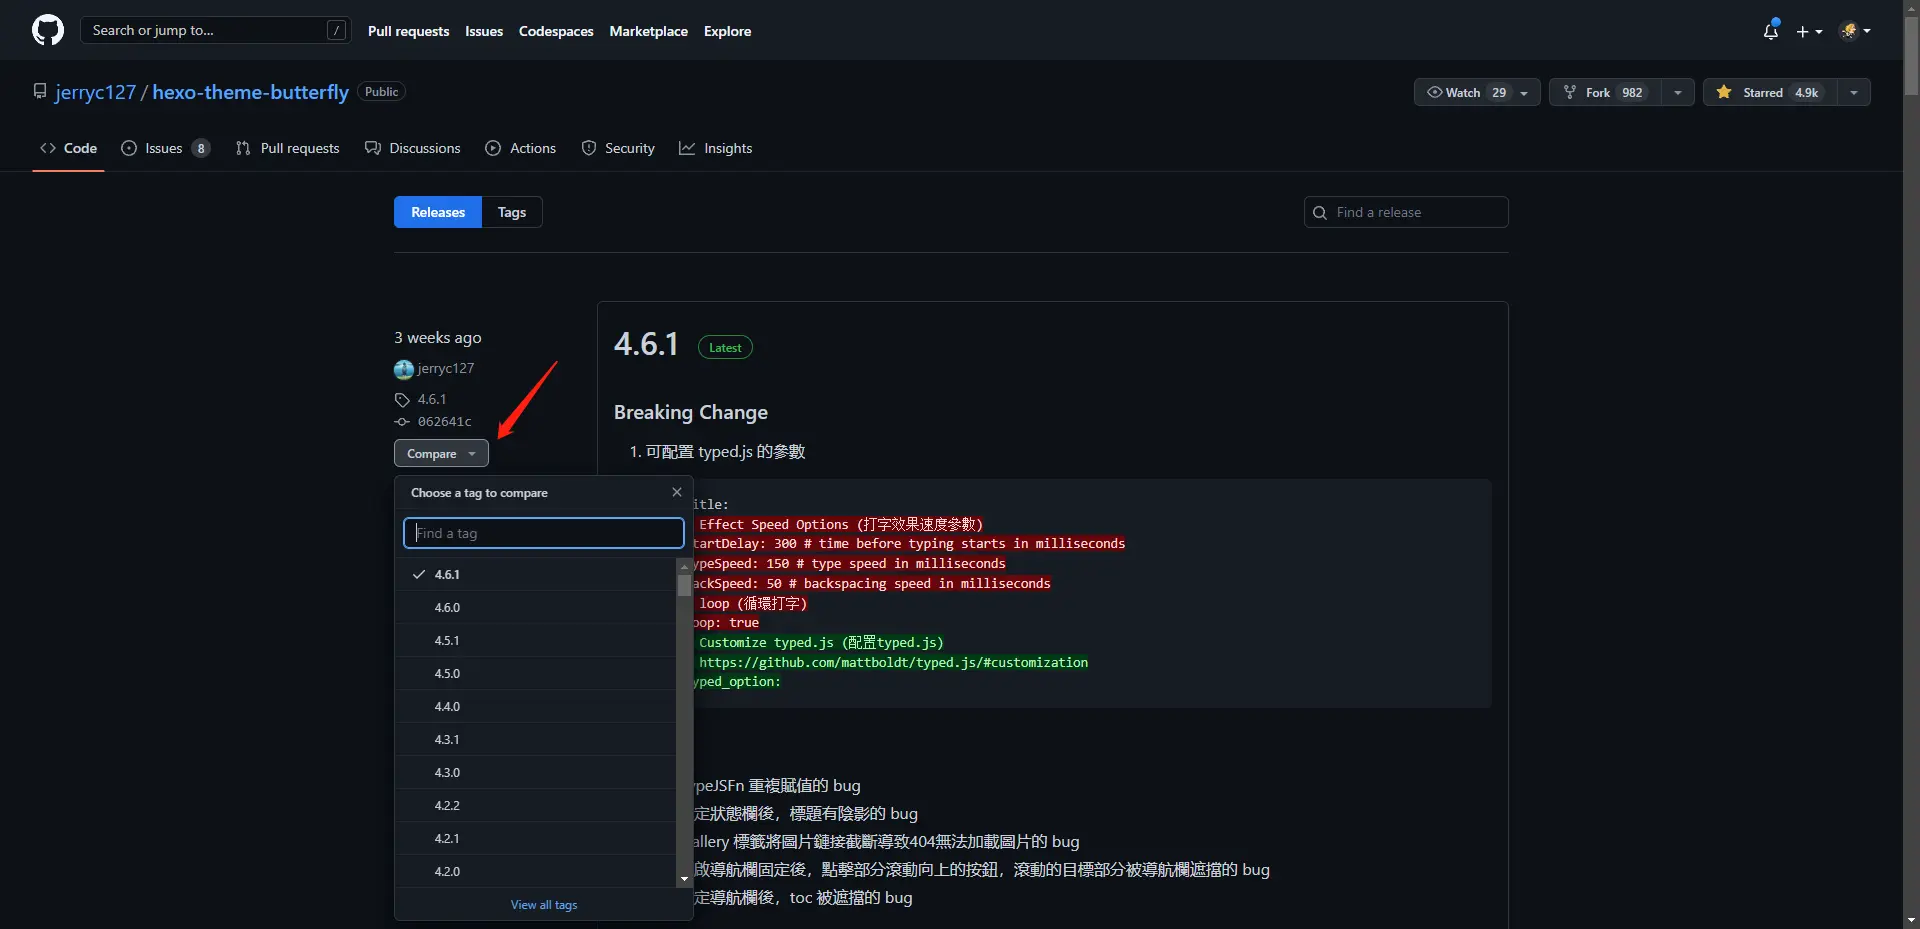
git pull之后打开 Butterfly 主题 GitHub Release 页面

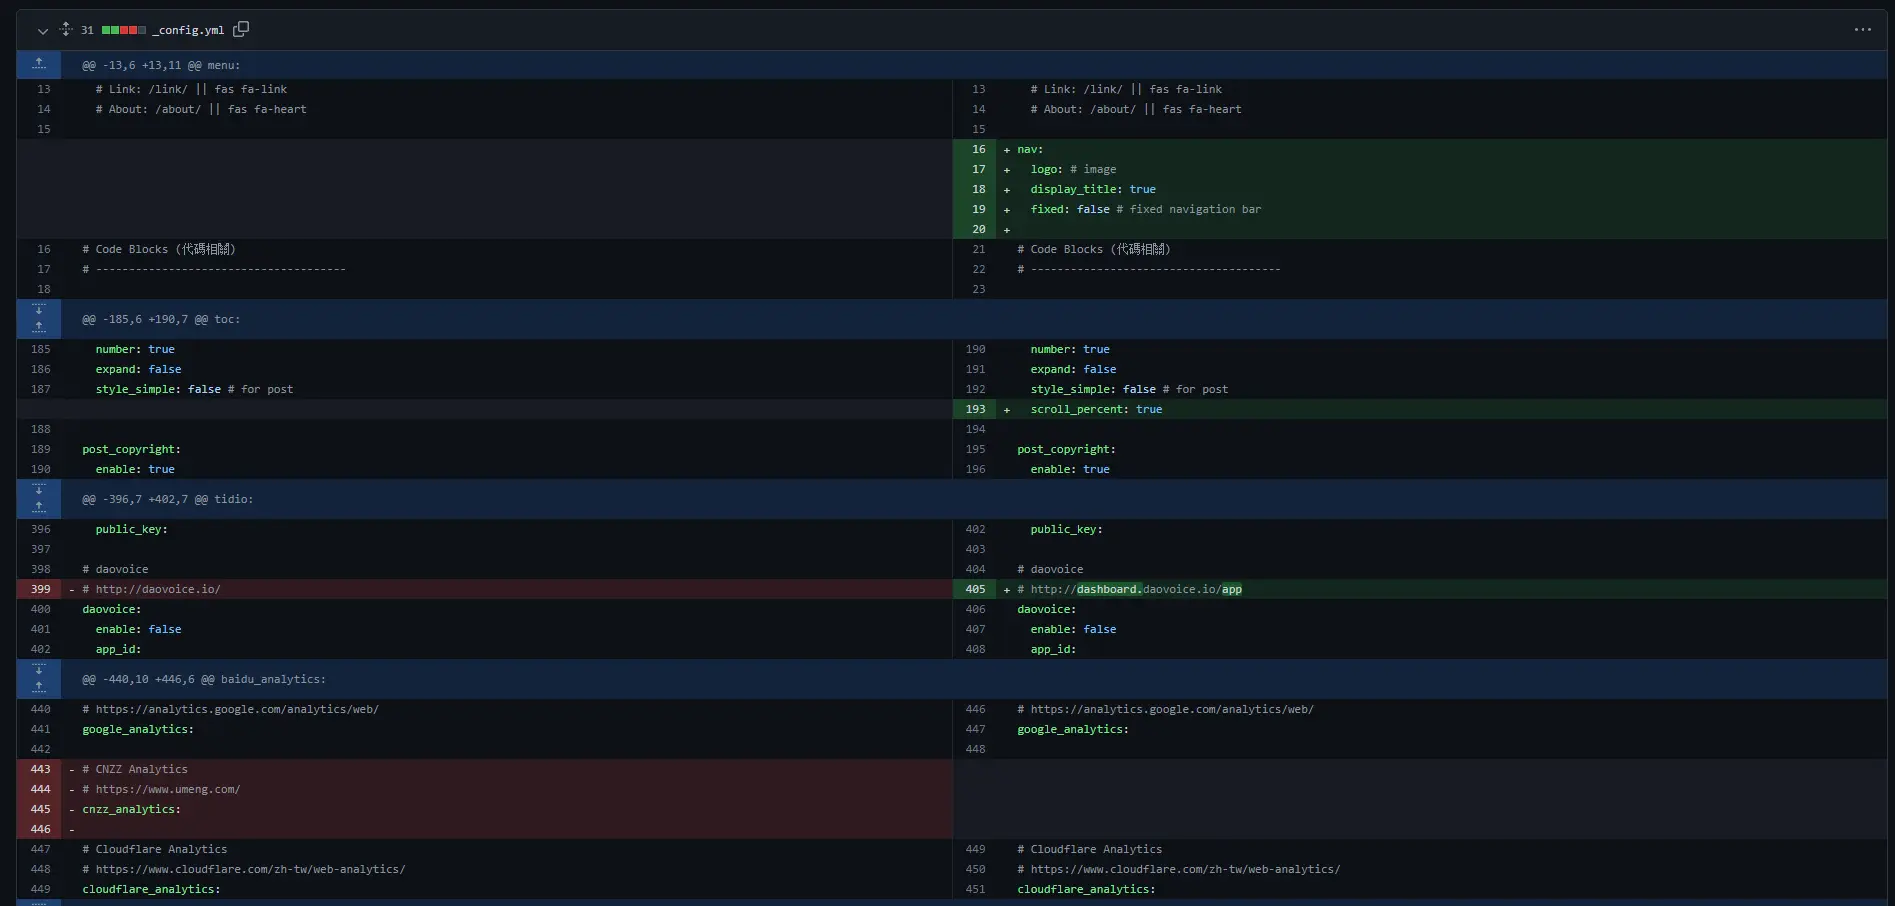
选择更新之前的版本,进入版本比对视图
向下滚动找到 _config.yml 的对比视图,并根据其更改调整自己的主题配置文件 _config.butterfly.yml


